In the last couple of posts I went over my plans to overhaul my home network and separate off the machines I have hosting web-facing services from the private network used by my family. In this post I’ll outline the configuration of my new MikroTik router, as someone with a bit of networking knowledge but no previous experience with the brand. The aim here is to seamlessly replace my ISP provided router without adding any additional functionality at this point; this includes IPv6 which was the only part I found particularly difficult to get working.
Quick set
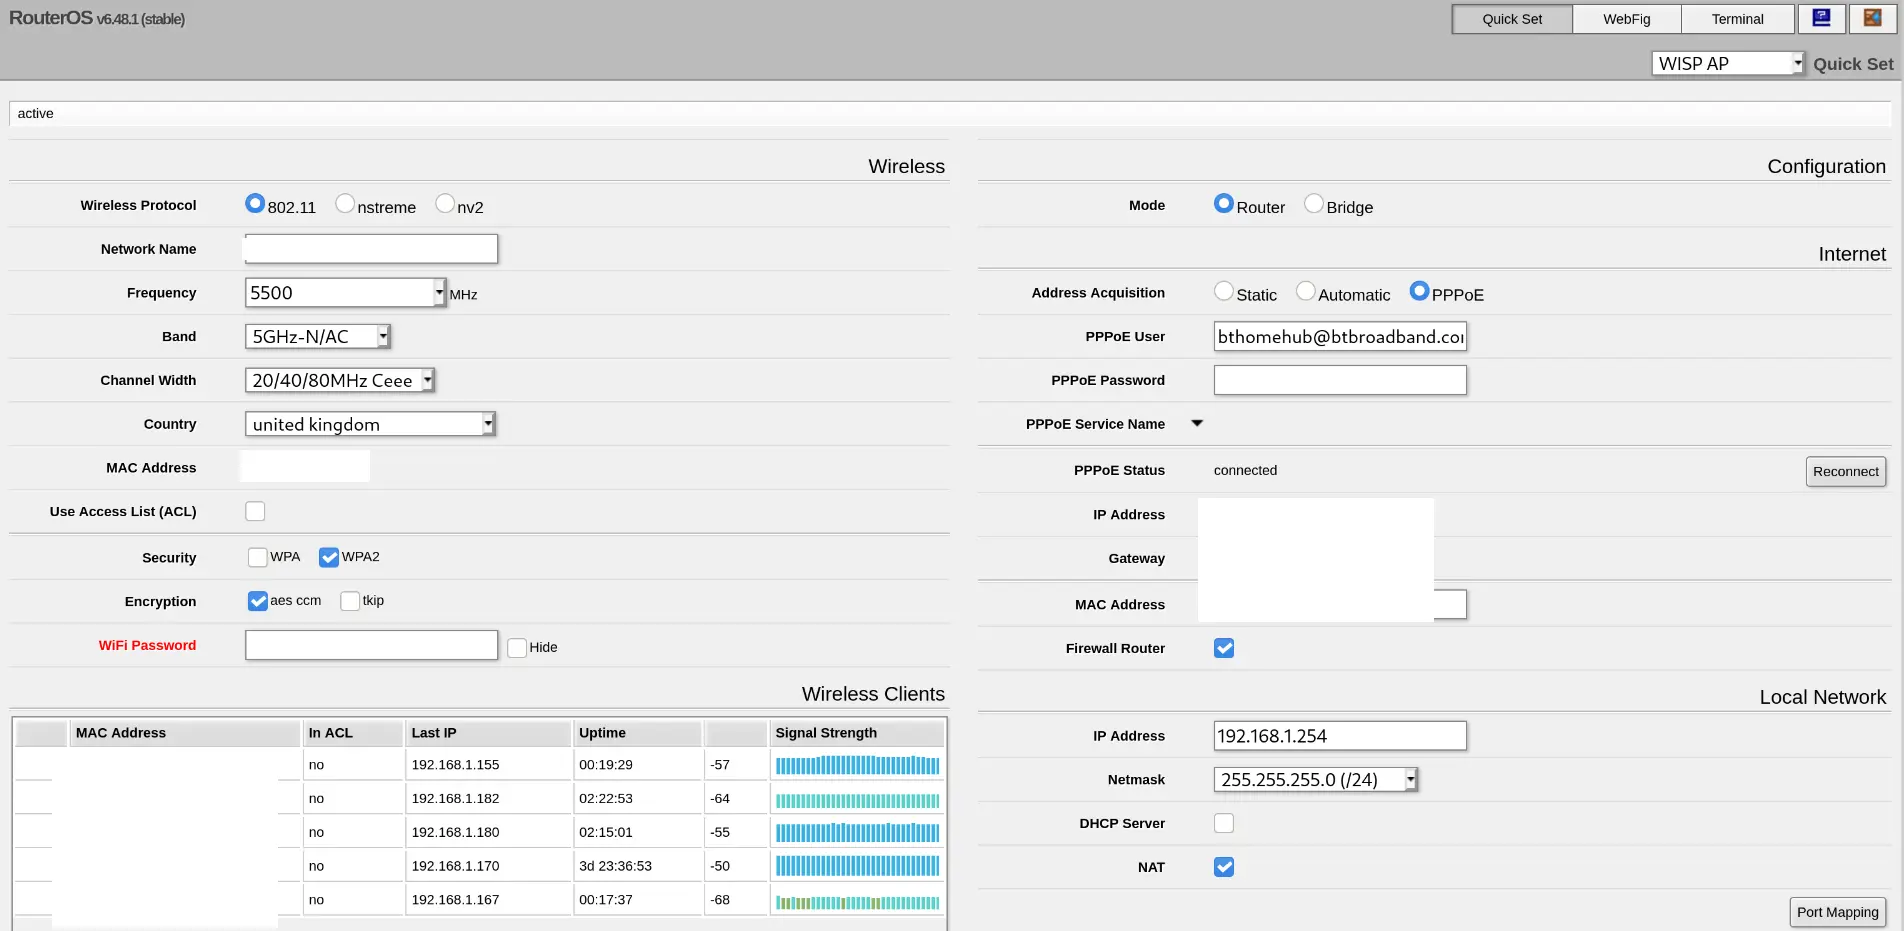
The hAP ac² (if you don’t buy a used one) comes set up with an IP address of 192.168.88.1, DHCP enabled for this range and no password on the “admin” user. These devices have a lot of options, but to help you get started when you first access the “Webfig” web UI you will first be prompted to set a new password and then presented with the simplified “Quick set” interface.
For our purposes the “WISP AP” mode (selected in the top right corner) is the one we want. Here you can fill in the basic(ish) details for our Wi-Fi, Internet connection and LAN IP address.
Unfortunately when I filled all this in, I hit a bug which made Webfig unavailable. Other people seem to have hit it previously but there didn’t seem to be any misconfigured firewall rules in my case. In the end I logged in via SSH and ran system reset-configuration to take it back to factory defaults again. The next time around I didn’t hit the problem and I’m not quite sure what I did differently.
When using Quick Set I just filled in the basic details for PPPoE and changed the LAN settings to match my existing router leaving Wi-Fi settings at the defaults for the moment. I disabled DHCP as I already have a Raspberry Pi with dnsmasq doing that job. Having the IP the same as my existing router means I don’t have to reconfigure my DHCP server and go round my house renewing DHCP leases.
Wi-Fi Configuration
I’m no Wi-Fi expert, but Wi-Fi on the MikroTik is nothing to write home about; it is an 802.11ac 2x2 router and the small physical size limits the coverage you’ll get. I might still set up the BT Smart Hub 2 I got given by my ISP as a separate access point, which has 4x4 MIMO on 5GHz and 3x3 MIMO on 2.4GHz. However for our relatively small house and modest needs it works perfectly well after playing around with the settings a bit. Sat in the lounge which is on the floor above the router in our three storey townhouse I can get a reliable 130Mb download speed. On the top floor I still get a really good signal scrolling through Twitter on my phone in bed.
I didn’t configure my Wi-Fi using the Quick Set screen and so to begin with I had the default configuration of a completely open Wi-Fi network. This obviously isn’t ideal and I’m not sure why it’s the default, but as I had already set an admin password for the router and it was only connected to my laptop I wasn’t terribly worried.
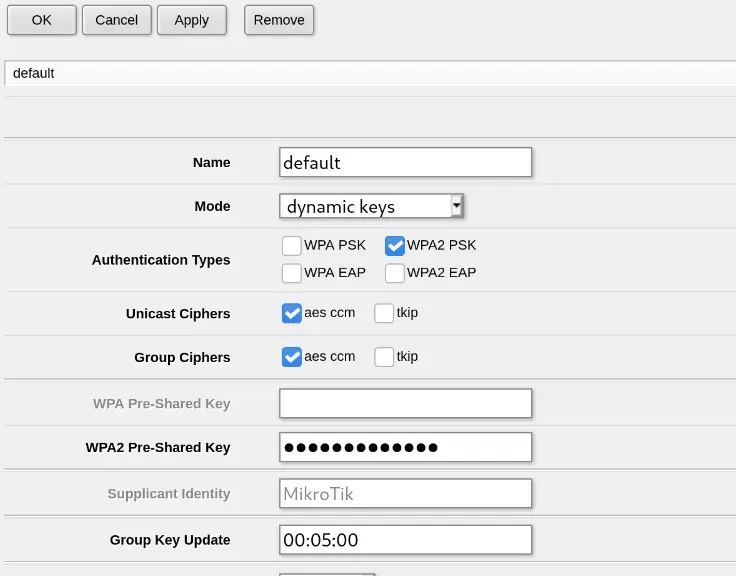
The first thing to do is to edit the default security profile and set up WPA2 encryption. I used very basic settings, but as with anything on MikroTik gear you have a lot of options if you want to use RADIUS or something more advanced. The Security Profiles are on a separate tab within the Wireless menu.
Security now taken care of I went digging into the features available to me. Having recently switched to iOS for my Phone I can no longer use the excellent WiFi Analyzer Android app to scan for the channels my neighbours are using and pick a quiet one. The “Freq Usage” and “Scanner” features are an excellent replacement for this.

Here’s the 5GHz band frequency usage in my house. As you can see it gives you the actual frequencies in MHz rather than the channel number as you might be used to, but this lines up with the radio configuration so I suppose it makes sense. Ideally you want four consecutive quiet channels; I picked 5500MHz as my starting channel.
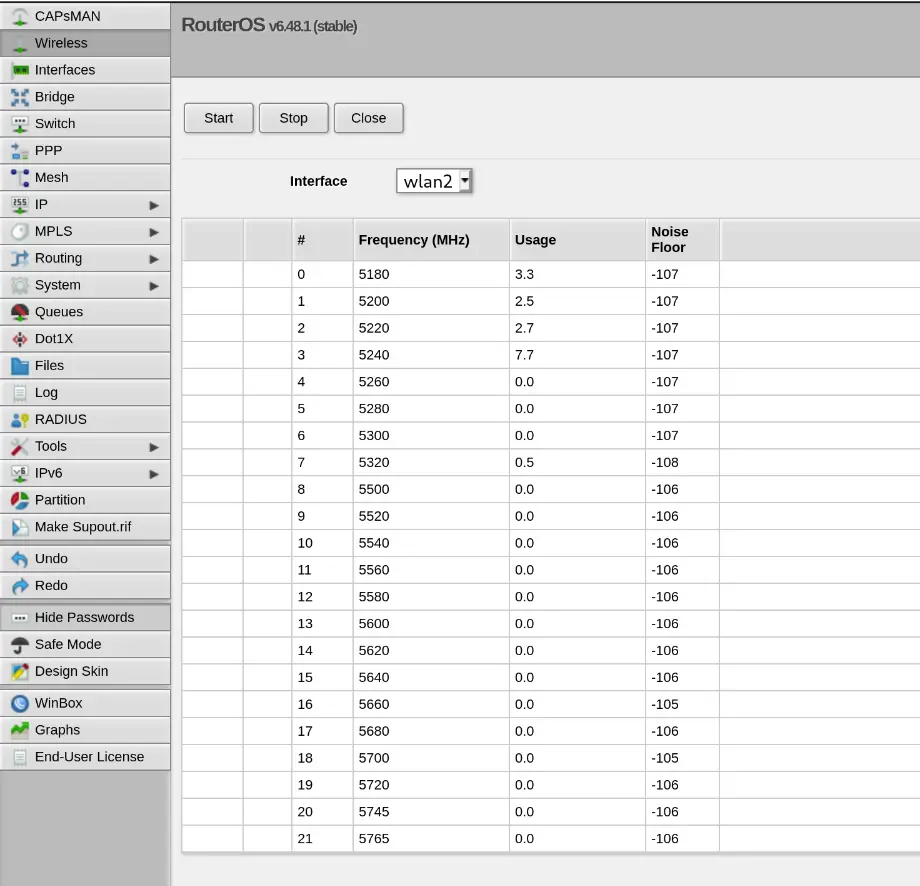
It’s worth noting at this point that not all channels are created equal, at least not in the UK. The rules seem to change fairly frequently but most channels in the 5GHz range are “DFS” channels. These frequencies are usually the most quiet but the downside is that there will be a delay (usually 60 seconds but sometimes up to 10 minutes) while your access point scans for radar already using that frequency in your area, before it starts broadcasting itself. I’ve also found that my Amazon Fire TV stick only seems to support non-DFS channels, but for now I’ll just live with that using 2.4GHz. You’ll have to decide whether the trade offs are worth it for you.
Here is the part of my 5GHz radio configuration which I’ve changed from the default (MAC removed for security or something, SSID removed for embarrassment):
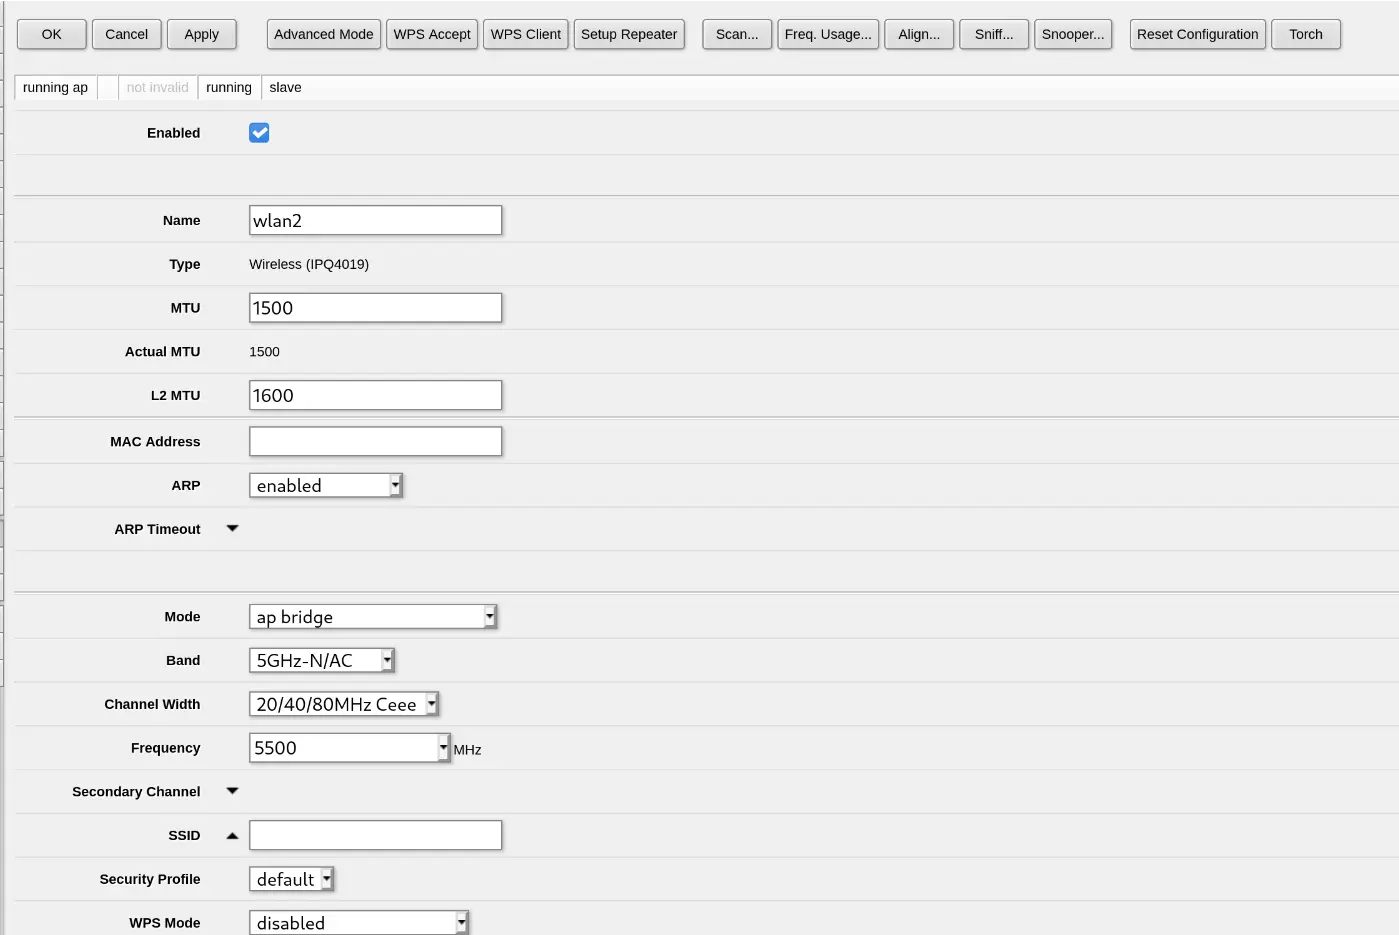
The “Channel Width” option is the only other thing here which is pretty interesting. I’ll just say this again I am not an expert and here are the official docs. However as I understand it, the 20/40/80mhz-Ceee mode is the best one available for this particular device (or eCee, eeCe, eeeC), and what this means is that the frequency you selected is used as the primary channel and then three channels above that are used as “extension” channels to give the full 80MHz width for maximum performance. If for example you don’t (or can’t) use DFS channels and one of the normal channels is slightly quieter than the rest, you can tailor this to the frequencies available to you.
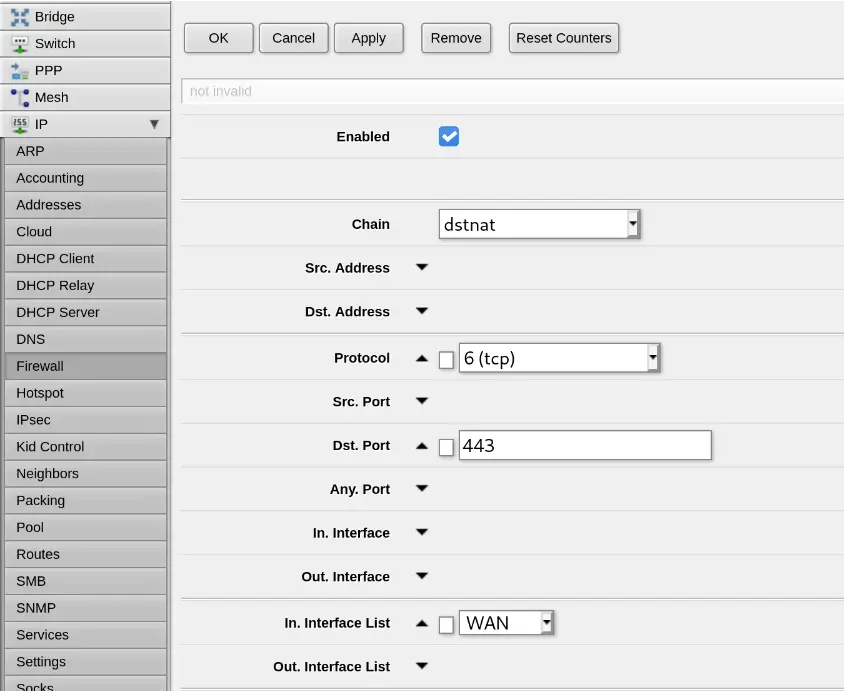
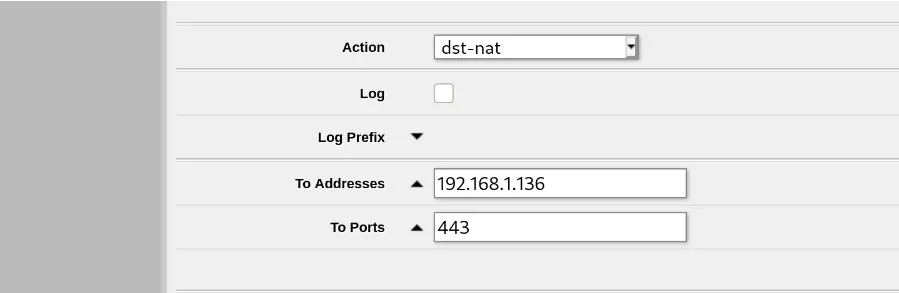
Port forwarding
I might be making life hard for myself by not learning the MikroTik CLI but configuring basic port forwarding made my brain hurt a little bit. Here’s the basic configuration I used under IP -> Firewall -> NAT -> Add New in Webfig. There are a lot of options on this screen so I’ve only taken screenshots of the parts I filled in.
MTU tweaking for maximum performance
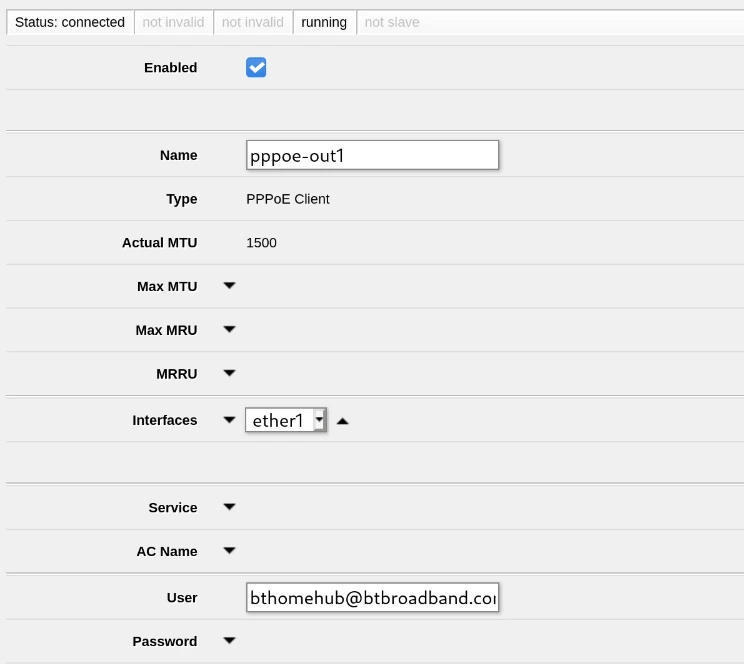
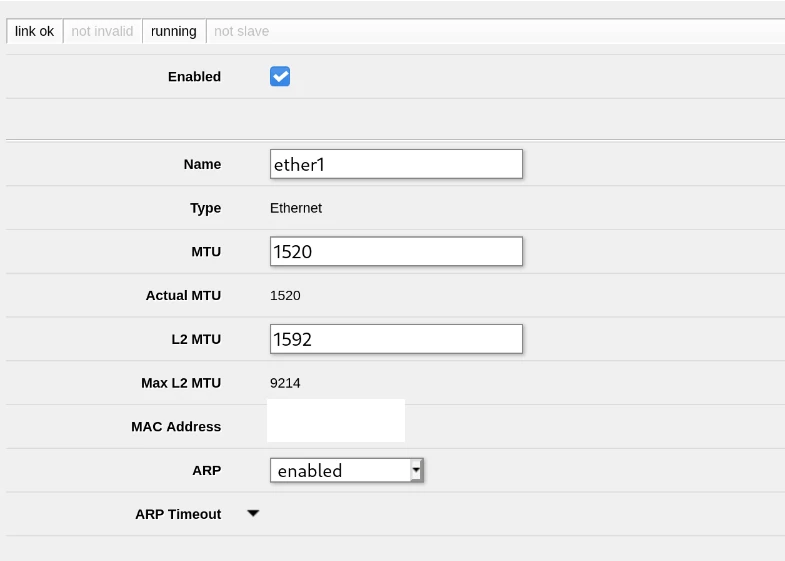
Where PPPoE is used there are potentially problems with the MTU (Maximum transmission unit) used for Ethernet frames encapsulated within the PPP tunnel. This is because the standard MTU for Ethernet is 1500 bytes, but PPPoE needs 8 bytes to store its own headers. This means that without your Internet connection being configured for a higher than standard MTU, then frames of 1500 bytes can’t actually be transmitted over the PPP tunnel, causing fragmentation or complete failure for some services like Netflix. This higher than standard MTU is called RFC4638 or “Jumbo Frames”.
BT and many other UK ISPs seem to support RFC4638 with an MTU of 1520, and I assume the ISP provided routers are configured for this. However many 3rd party routers like the MikroTik don’t come configured for this by default, so we need to make a few tweaks to our configuration.
Andrews & Arnold have a section about this on their wiki, but the information seems to be out of date for the latest MikroTik firmware. Thanks to Daryll Swer for linking to this MikroTik forum thread and generally providing guidance on this. He’s got some interesting MikroTik related posts on his blog if you’re interested.
True to form I’ve configured this all this in Webfig in the Interfaces section under pppoe-out1 for the virtual PPPoE interface and ether1 for the actual physical port. Leaving the MTU and MRU on the PPPoE interface unset should allow it to auto-negotiate with your ISP’s equipment for the best MTU/MRU they support; read the linked thread for more information on that one.
IPv6
One of the reasons I went with BT for my Internet is that they are one of the relatively few UK residential ISPs which support IPv6; their Smart Hub routers are configured for it out of the box and I’ve never had a problem with it. However I, like most people, are much more used to IPv4 and so many 3rd party devices come with IPv6 disabled by default to keep things simpler. However I want my IPv6 working, so here’s the configuration I ended up with.
I mostly used this really detailed blog post by Joe Robinson.
First of all I had to enable the ipv6 package, which you probably can do somewhere in Webfig but I did it over SSH with:
1
2
system package enable ipv6
system reboot
The next thing to do is set up the firewall which unfortunately doesn’t have any default configuration. I’ve shamelessly lifted the rules from Joe Robinson’s blog post, and I’ll repeat what he has said there I am not an expert, these may not be secure. That said, the easiest way to set these up is the CLI over SSH. Here are the commands:
1
2
3
4
5
6
7
ipv6 firewall filter add action=reject chain=input comment="Reject invalid traffic to the Router" connection-state=invalid in-interface-list=WAN reject-with=icmp-no-route
ipv6 firewall filter add action=reject chain=forward comment="Reject unsolicited traffic to the LAN" connection-state=!established,related,untracked in-interface-list=WAN reject-with=icmp-no-route
ipv6 firewall filter add action=reject chain=forward comment="Reject invalid traffic to the LAN" connection-state=invalid in-interface-list=WAN reject-with=icmp-no-route
ipv6 firewall filter add action=accept chain=input comment="Accept LAN traffic to the router" in-interface-list=LAN
ipv6 firewall filter add action=accept chain=forward comment="Accept LAN traffic" in-interface-list=LAN
ipv6 firewall filter add action=accept chain=forward comment="Accept LAN traffic" connection-state=established,related,untracked
ipv6 firewall filter add action=drop chain=forward comment="Drop everything else" log=yes
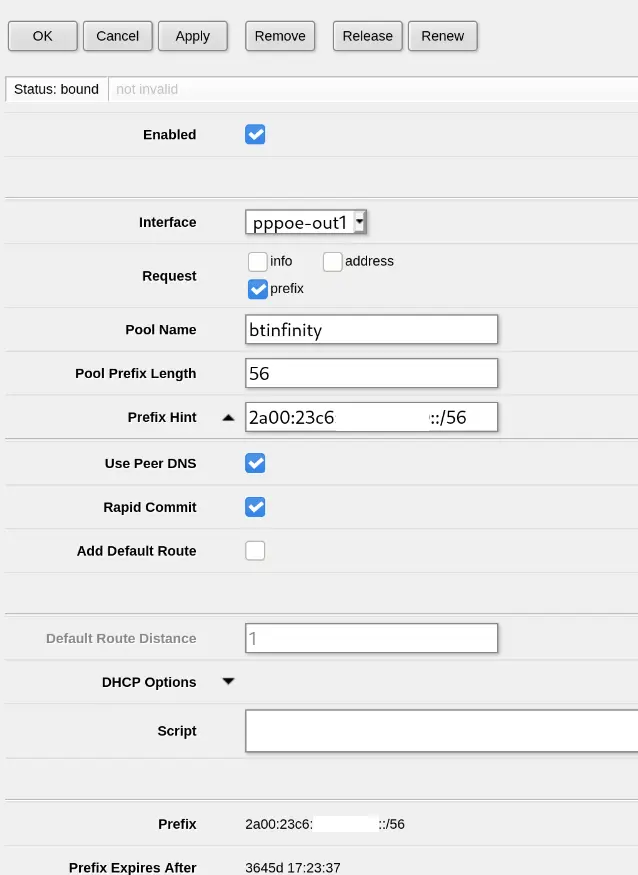
Now you should in theory be secure, you can enable the DHCP client on the PPPoE interface for IPv6. This is under IPv6 -> DHCP Client in Webfig. The prefix hint was left blank initially and then filled in after I got the prefix from my ISP the first time around; this should encourage them to give me the same prefix next time around, although it looks like I’ve been given this /56 prefix for 10 years!
You’ll notice here that I didn’t select “Add Default Route”; this seems to be set up automatically and this box just added a duplicate route I didn’t need.
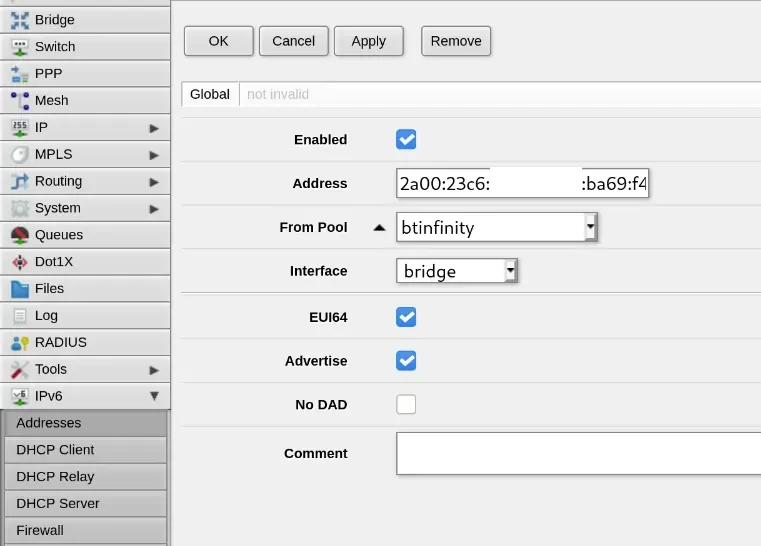
Then under IPv6 -> Addresses you can set up your LAN “bridge” interface to use this pool of addresses. Here the “Address” field will be ::/64 when adding the configuration; it is then filled in automatically when you save:
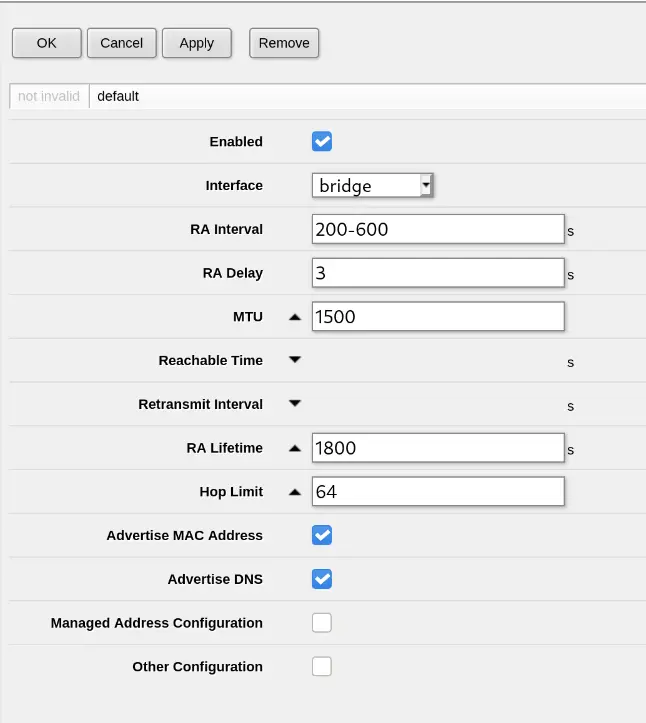
Then you must set up Neighbour Discovery or devices on your LAN won’t get assigned addresses, this is under IPv6 -> ND:
And that should hopefully be it! I’ve continued to use my separate DNS server for IPv6 clients running on dnsmasq, which seems to respond with IPv6 addresses by default anyway, even if it is operating over IPv4 at the moment.
The next post
I’ve purchased a TP-Link TL-SG105E managed switch for next to nothing off eBay which should be delivered some time this week. When that arrives I’ll configure a VLAN “trunk” to my office/shed from the MikroTik so I can start separating off my web-facing homelab from the rest of my network over the single Cat6 cable I have.